Welcome to the LZDV Setup Guide
This guide will help you set up and configure LZDV for optimal performance. Follow the instructions in each section to ensure a smooth installation and configuration process.
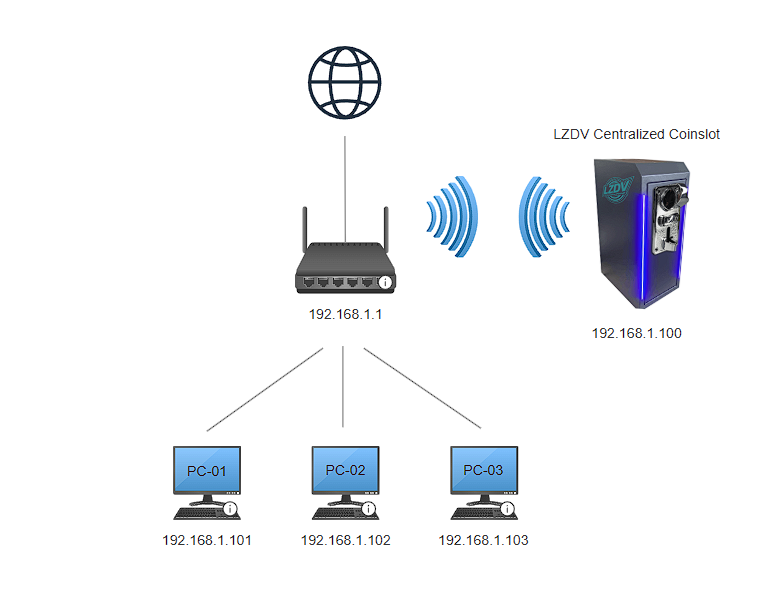
Wiring diagram and Network diagram

Installation
To install LZDV Centralized Pisonet to ESP8266, follow these steps:
Prerequisites:
• CH340 driver must be installed for ESP8266.
• If not, download it here: Windows CH340 Driver
• Ensure the driver is installed before flashing the .bin files.
- Download the latest version of LZDV v1.0.1 from the official website.
- Extract downloaded files.
- You will see 2 folders (ESP8266 Bin files folder and Station timer folder)
- Open the ESP8266 Bin Files folder.
- Connect your ESP8266 to the computer via USB cable.
- Right‑click NodeMCU‑PyFlasher.exe and select “Run as Administrator.”
- Select the correct serial port (e.g., COM4).
- Click “Browse” and select lzdv_v1.0.1_FILE_1.bin.
- Set the offset address to 0x000000.
- Choose a baud rate of 115200.
- Set the flash mode to Dual I/O (DIO).
- Ensure “Erase Flash” is set to NO.
- Click “Flash NodeMCU” and wait until the process completes (100%).
- Click “Browse” again and select lzdv_v1.0.1_FILE_2.bin.
- Set the offset address to 0x200000.
- Click “Flash NodeMCU” and wait until the process completes (100%).
- Open the Station Timer folder.
- Right‑click LZDV Client v1.0.1.exe and select “Run as Administrator.”
- Click “Install” to set up the Station Timer on your PC.
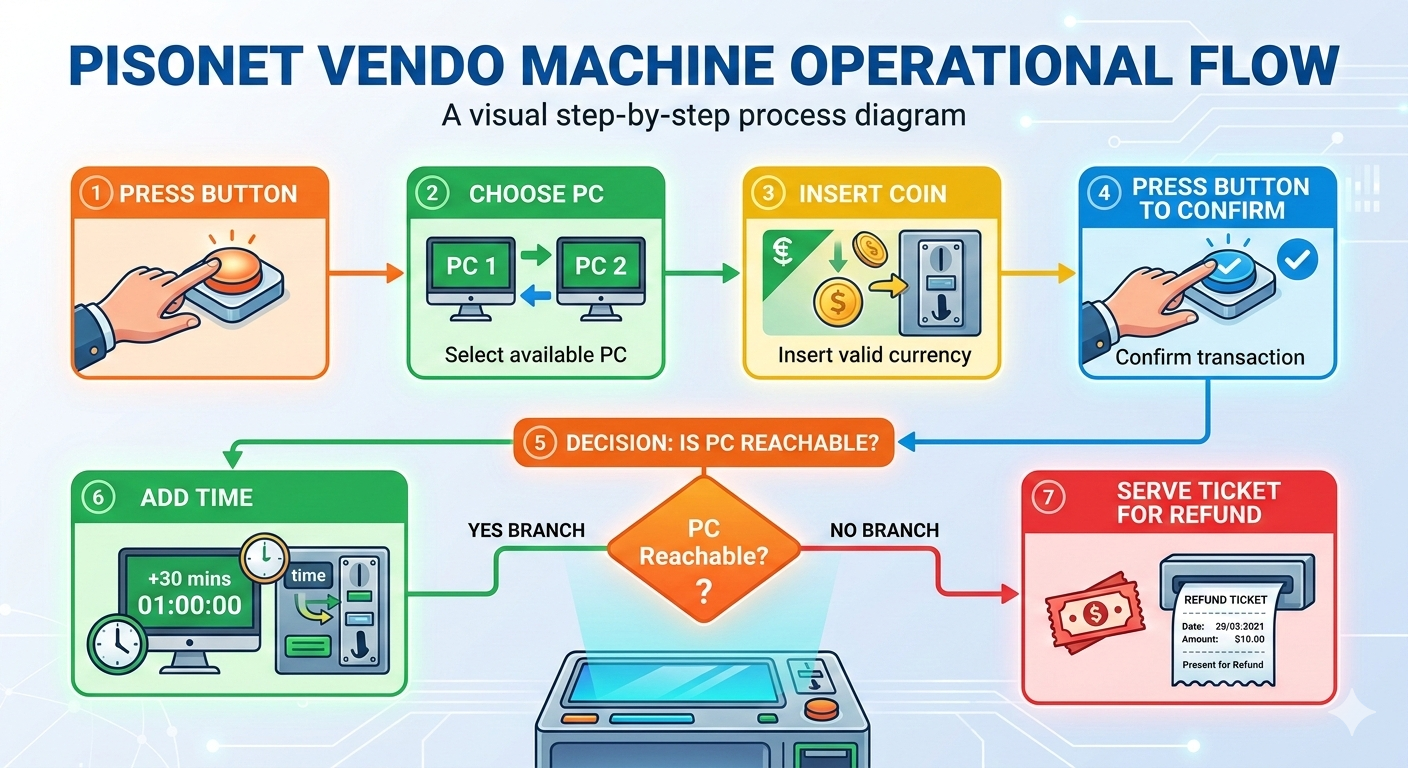
- Launch the LZDV Client — the lock screen will appear.
- Press Ctrl + Alt + K to access the admin settings.
- Log in using the default credentials: admin / admin.
- Update the iCafe Name, Member login username, and Server IP (ESP8266 static ip).
- Change the default admin credentials, then click “Save Settings.”
Configuration
After flashing bin files, next step is to configure it
- Turn on the device.
- On first boot, the device will enter Soft AP Mode. Open your Wi-Fi settings and connect to LZDV_Centralized_Setup.
- Once connected, open a browser and go to 10.20.30.1.
- Log in using the default credentials: admin / admin.
- Go to the Settings tab, enter your Wi-Fi details, update the default login credentials, and click Save.
- In the Rates tab, configure your time rates based on each peso and click Save.
- In the Station tab, add your client stations and click Save.
- After configuring rates, stations, and settings, return to the dashboard and click Reboot.
Usage
Once LZDV is installed and configured, you can start using it to manage your pc time.
Troubleshooting
If you encounter any issues while using LZDV, refer to the Troubleshooting Guide for common problems and their solutions.
Q: No pc selection
A: setup pc station at nodemcu admin